Some of you may know I live on the questionable bleeding-edge and run Arch Linux on all my servers, but the challenge of keeping them up to date specifically revolves around remembering when to log in to update everything. After exploring a few fleet management systems (e.g. Chef, Puppet, etc.) I settled on using Ansible. Specifically the Ansible Tower project now open-sourced as AWX has been really easy for me to set up and use. My method was as follows:
Within AWX you need to do additional setup pieces:
From there, I have a series of ansible templates for provisioning (YAML config templates with j2 file templates):
I have also some ansible templates I set on a schedule to keep the hosts up to date automatically:
I’ll finish off with some problems I’ve run into over the past few years from trying to update things (or in some cases, forgetting to update):
Happy updating.
]]>I’ve been a huge fan of VR ever since we saw some of the first few consumer products hit the market in around 2015/2016, and so back then I got myself a HTC Vive headset and controllers and upgraded aspects of my gaming PC to accommodate the more strenuous requirements at the time. The game Beat Saber has particularly piqued my interest (in addition to a few other discoveries such as Space Pirate Trainer, SUPERHOT, and Pistol Whip). I also like occasionally streaming my ventures on Twitch. However there are some significant differences when trying to stream from the perspective of a typical keyboard+mouse/controller non-VR game, versus from the perspective of a controller/tracker VR game.
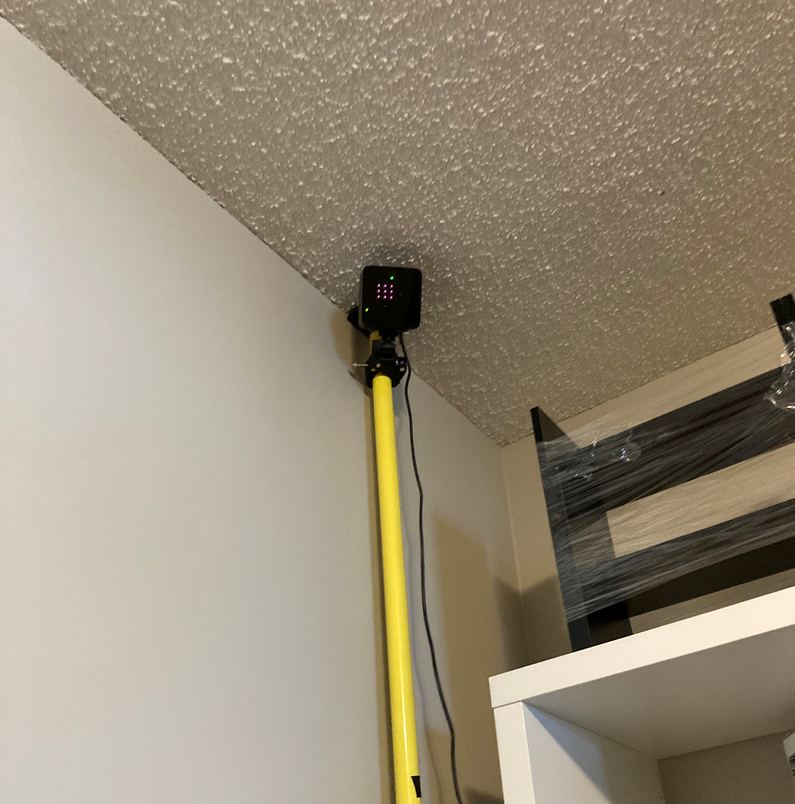
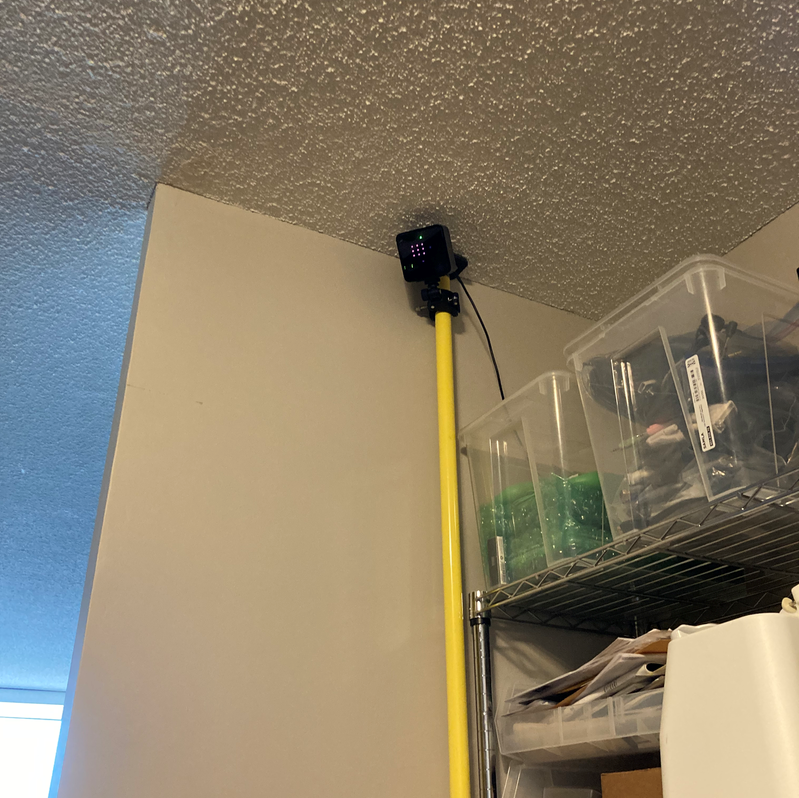
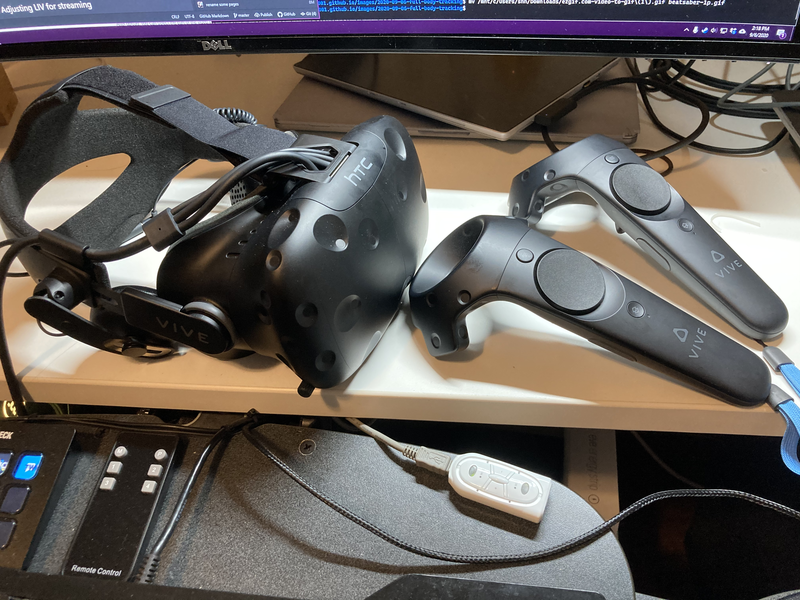
The setup I’ve had for some time is an original HTC Vive Headset from around 2016, complete with the 2016 era controllers. It comes with two lightboxes, which are used to track the position of the headset and controllers with a remarkable amount of accuracy and smoothness.
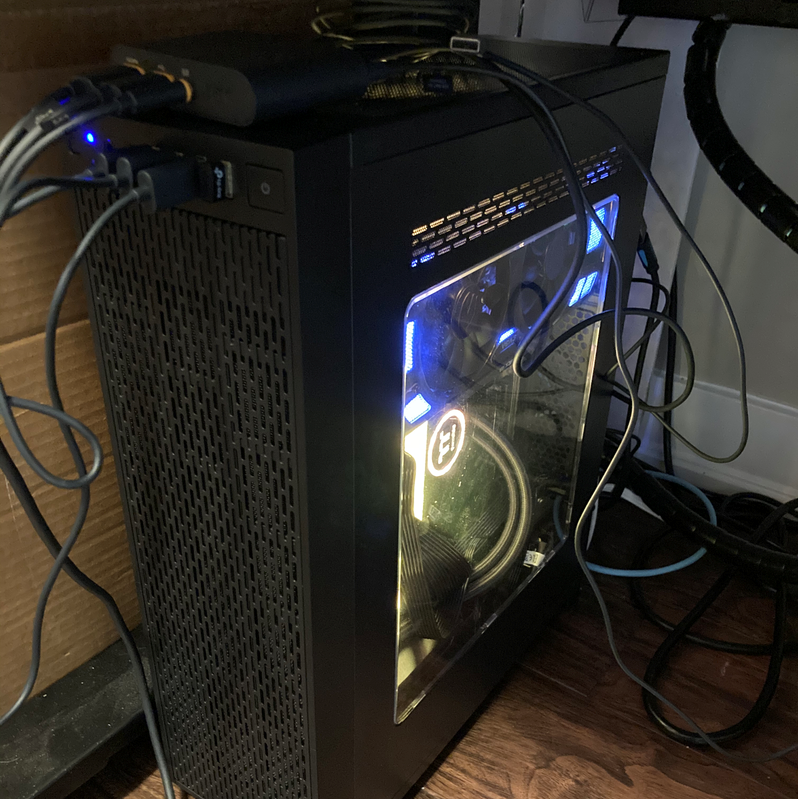
The VR headset itself supports a resolution of 2160×1200, which is about 1080×1200 per eye. To support this sort of resolution, you generally needed a pretty beefy graphics card at the time, so here mine is supported by a GTX 1080.
All the VR games generally have a non-VR window that is displayed on the desktop monitor. You can easily capture that output using some popular off-the-shelf software, such as OBS. The view is somewhat indicative of what’s visible in the headset, usually from one eye, but of course unless the game supports adjusting the FOV, the default FOV has a hard time showing everything that’s going on. There’s also the problem of, unlike controlled in a mouse/keyboard/controller situation, human bodies actually sometimes have very jerky movement. As the wearer of the headset you don’t notice since your eyes naturally locks onto targets while you move, however for external viewers it can be very disorienting.
Compare that to this of Halo: Reach where you can get a better field perspective of what’s going on.
You’ll want three trackers, two for your feet and one for your waist. This is the typical setup for most Full-Body tracking situations. The trackers themselves only come with a camera mount for attachment, so it’s up to you to figure out how to attach them to your person. I went ahead and bought the TrackBelt straps from Amazon and they work well enough. Note: despite the picture, the straps DO NOT come with trackers! Each Vive Tracker currently retails for $99 USD.
It’s fairly easy to set up a single HTC Vive Tracker. It’s harder to set up 3. Kudos to this reddit user for figuring out the careful set of steps, reposted here:
If you have lost track of Tracker A, B, etc. I recommend labeling your dongles and your trackers:
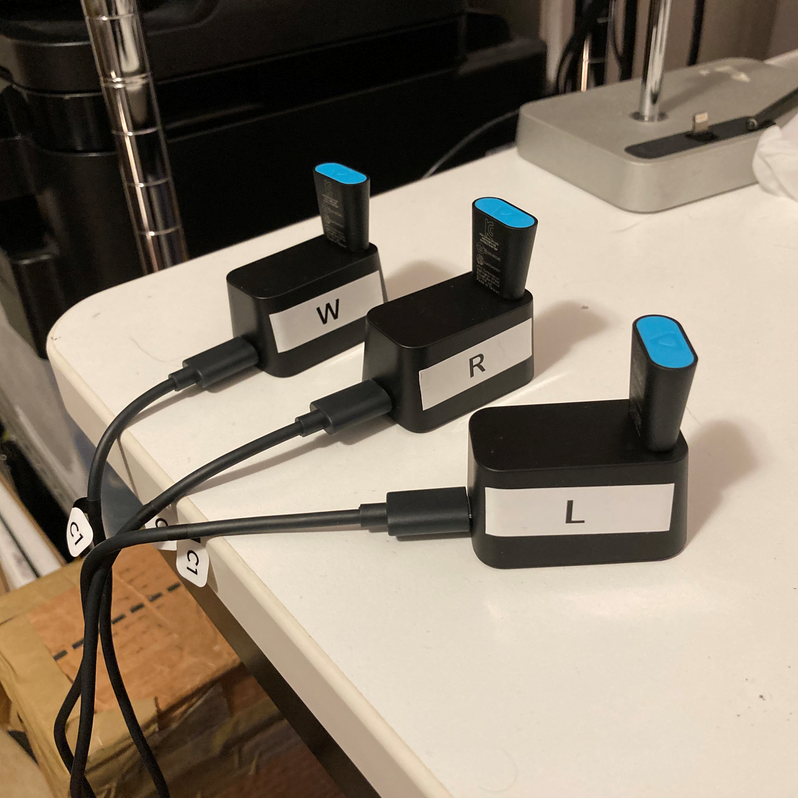
R = Right foot, L = Left food, W = Waist.
You’ll of course want to correctly label each tracker as you add them, since otherwise it’s basically impossible to distinguish which from which.
I spent a lot of time trying to get avatar setup with Beat Saber back in April 2020. At the time I was armed with only a Kinect, which provided emulated Vive trackers to try and make the feet and waist visible to Beat Saber Custom Avatar. All the results at the time were extremely poor; the avatar would twist itself/get mangled, which was just not a good look. I had to start thinking about moving soon after, so I dropped that project.
Since then, I got the HTC Vive Trackers and attempted the whole setup process again. I couldn’t figure out how to get it working with Custom Avatar out of the box, and also by that time I had spent hours trying to get them configured and pairing properly on the computer. Through some more googling, I discovered a piece of software called LIV. While I was fully expecting to have to watch some more YouTube or jump on a Discord to figure out how to install the software, I was pleasantly surprised that you could just download the software on Steam. So that’s what I did.
The guide is fairly straightforward regarding setup. You have install the LIV driver which provides more virtual trackers into SteamVR, and typically you also need to start the compositor any time you want to stream. The compositor provides a nice window separate from the game window and separate from the Steam VR mirror display. For this reason I recommend disabling the Steam VR mirror display, and to reduce the resolution of the native game mirroring if you don’t want to stress out your video card.
To pull up the LIV menu, you need to stare at and point at the LIV icon floating on the ground.
Adding and configuring an avatar is very easy with LIV. I recommend for each new play session to re-calibrate your avatar to the trackers, since you’re likely putting on the trackers slightly differently each time, and otherwise it will distort your avatar to viewers.
If you don’t want to use the stock standard boring avatars, you should go look for some online. Note that not all avatars support Full-Body Tracking, and actually if you are more savvy with 3D modeling software (e.g. Blender), there are a few guides out there, such as this one. But if you’re not into that, I recommend adding tag:FBT
and tag:Full Body Tracking
to refine your search results. I am currently using Sour Miku Black v2.
If you are wanting to fiddle with the LIV camera settings I recommend using a gamepad or controller.
When you’re done, you can close the LIV menu by staring and pointing at the ground again.
Now when it comes to connecting all the pieces together to actually stream your VR content, you’ll need to probably get an account on a streaming website such as Twitch or YouTube. You’ll also need streaming software; I used to use OBS but more recently I’ve switched to StreamLabs which has roots in OBS. If you connect your Twitch account to StreamLabs, it will set up the output stream more or less automatically; alternatively if you have a prior OBS profile it can import those settings. If all else fails, you can refer to the Twitch Streaming Configuration Suggestions.
Within OBS or StreamLabs, you have the opportunity to set up different Scenes; this more or less shows different kinds of views on the stream, and is commonly used with Transitions for cases where you have a custom Scene for intermissions, breaks, etc. from gameplay. I am not a serious streamer, so I just use it to organize different game streaming “profiles” depending on what kind of game I want to stream. Within a Scene you can configure a number of different Sources, that can range from captured window output to custom media to custom browser-based UI widgets.
Speaking of widgets…
This one is wholly optional and has nothing to do with Full-Body Tracking but I found it to be a really nice indicator on the stream of specifically the song and difficulty level that I was currently playing. It’s primarily powered by Beat Saber HTTP Status which exposes Beat Saber stats on a local websocket, and then from there you can host a UI that listens periodically to that port. It’s specifically very nice for browser/HTTP-based UI widgets that can be added to your favorite capture software.
Interestingly I vaguely remembered this mod being available on ModAssistant, but I couldn’t find it. However it seems at the time of this writing, the most recent version of HTTP Status supports one patch version behind the current one, so I suspect it’s not shown for those reasons. So instead you can install it manually. If that doesn’t work out of the box, it’s fairly trivial to use strings
and xxd
to find the Beat Saber version hardcoded in the DLL, and change it slightly to support the most recent version.
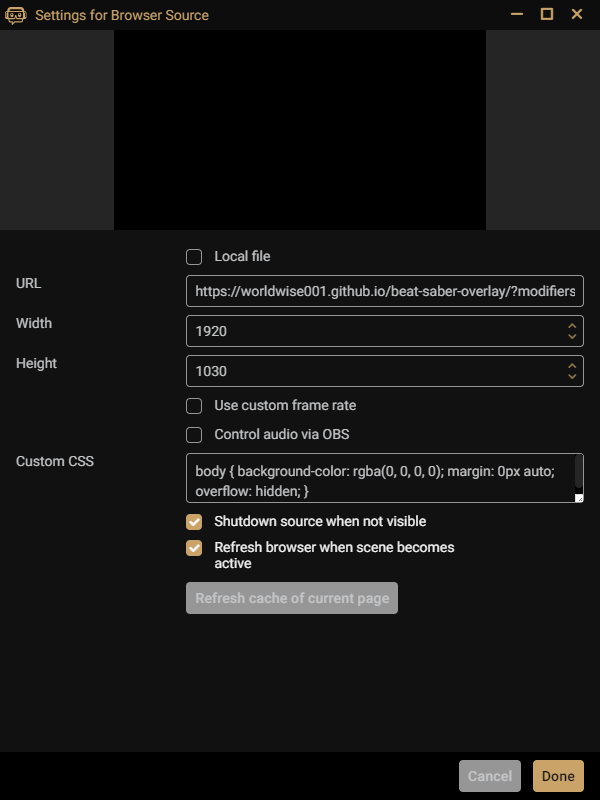
On its own, this mod doesn’t do anything, so you’ll need to find something that reads from the websocket and provides an overlay. For that I just cloned reselim’s Beat Saber Overlay, and published it via github pages. I then created a browser UI widget and pointed it to the appropriate URL, which for me is https://worldwise001.github.io/beat-saber-overlay/.
Overall this project happened over several hours of research distributed over several days; originally I embarked on this quest in April, and it took time for (a) the Kinects to arrive for testing, (b) the Vive Trackers to arrive for testing, and (c) for me to move to a different country and set up VR in a better space. But I am fairly pleased with the final results, and so I hope this post will help connect the dots of some of the articles that were scattered around the internet, or at the very least provide some entertainment value documenting my different roadblocks along the way.
Good luck and happy VRing!
The first thought I had was trying to figure out how to get a third-person camera view working with Beat Saber. I had seen some folks demonstrate that capability on YouTube in the past, so I knew it was possible, and I figured it was through modding of some kind since modding is fairly popular in that community.
There are a few different guides to aid first-time modders, including the BSMG Wiki and Beast Saber; I used some combination of these guides. While many claim that you can technically set everything up manually, what you probably want to use is a piece of software called ModAssistant. I was remarkably surprised at how easy this was to set up. You download the latest release, and simply run the executable. It doesn’t actually install anything, so keep that executable aside from your Downloads folder if you don’t want to lose it.
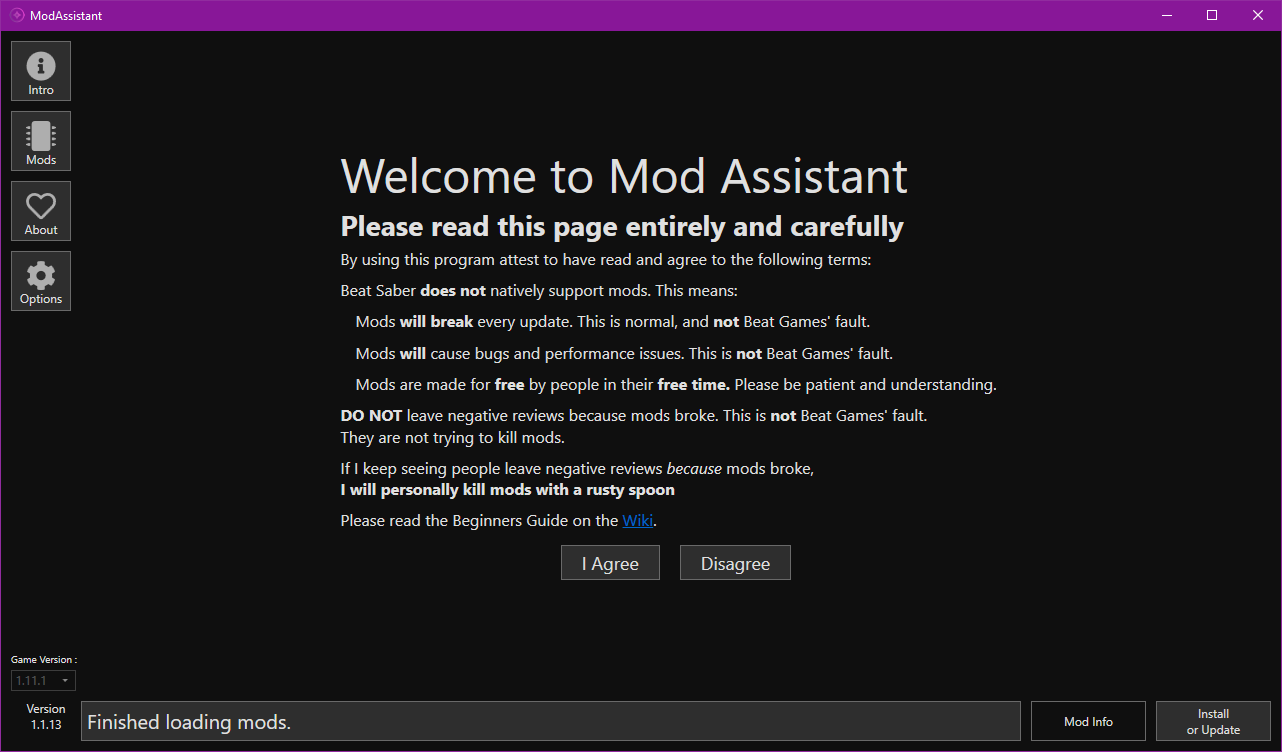
I love some of the user-friendliness of this windows. Note the Game Version and the ModAssistant version tracked in the lower left. You have to click “I Agree”, which will install the basic scaffolding (probably by overwriting certain DLLs/binaries). If nothing seems to be happening, you can click on the “Mods” icon on the left hand side. That brings up something similar to the following window:
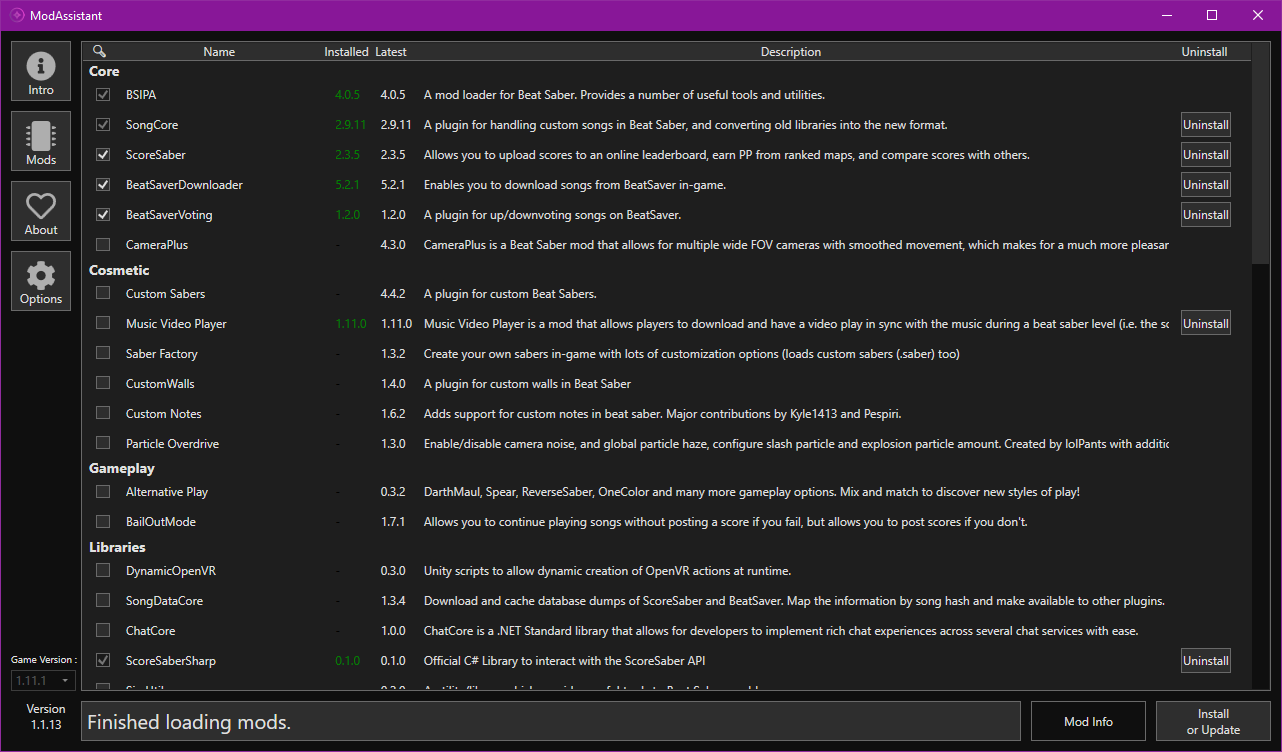
Perhaps non-intuitively, you want to click “Install or Update” which will install all the mods indicated by the Checked Boxes. It should then show the green installed version numbers. As you can tell there are some core libraries that are generally required for all the other mods; digging into the source code it seems like it provides a bunch of useful convenience methods for modders.
An important caveat is that the Beat Saber releases change semi-frequently, and this seems to be a frequent source of breakage. I don’t remember the last time I had to handle this, but if you are fine with wiping away your mods and starting fresh, you can do the following:
<your steam install folder>/steamapps/common/Beat Saber
.CameraPlus is a Beat Saber mod to configure custom cameras (specifically for popular third-person cameras) to view the player in Beat Saber. It commonly is also used in tandem with Custom Avatars. Setting up CameraPlus is only partially intuitive. It’s easy to install through ModAssistant, as shown in the screenshot above, but it does take some finagling to get the view working as you intended. Some of the gotchas I ran into include:
Once you have CameraPlus install, the way to configure it is from the Desktop Window of Beat Saber, not from within the VR headset. If you right-click on the window, the CameraPlus menu interface pops up and you can do things such as add/remove cameras, and switch between First-Person and Third-Person view.
If you’re not happy with the Third-Person camera view, you can put on the VR headset and move it around with your pointer. Hold the trigger to grab it, let go of the trigger to let it go.
At the end of the day, I didn’t end up using CameraPlus for my streaming since I found LIV to be slightly easier to set up. But more on that later.
The Beat Saber Custom Avatars mod is intended to pair with CameraPlus to provide a representation of your person holding the sabers in-game. Unfortunately for some reason this isn’t installed through ModAssistant, so you have to follow the instructions yourself. Note you probably don’t need to manually install DynamicOpenVR, since that is provided by ModAssistant. However you do need to download and install (read: extract the contents) of Custom Avatars in your Beat Saber install directory, i.e. usually <your steam install folder>/steamapps/common/Beat Saber
.
At the time of this writing, there’s actually a bug with Custom Avatars, so check the thread and download the pre-release rc2 version to see if it fixes the bug for you (it did for me).
Once the files are in, the left screen upon startup now has a Mods Tab with an Avatars section you can configure. From there you can choose the appropriate avatar you want to “wear”. Note that the menu show Full-Body Tracking support, however the legs move really weird when we pick a Full-Body Avatar. That’s because this is only using trackers on the headset and the controllers aka hands, and so the avatar “guesses” where your feet might want to be and move them appropriately.
There’s one problem with using the Template Avatar and that’s this:
Note: this does not use LIV, and sets up virtual vive trackers using a Kinect. It probably is not what you want!
TBD, but it’s gnarly.
]]>Some time ago I had upgraded my work laptop from Mojave to Catalina. The result of that, as a lot of you probably know, is that due to the fact that it now only supports 64-bit applicatons this meant a lot of apps/libraries stopped working, complaining of mismatched dylibs. As a veteran Linux user, I had seen something similar many many times with mismatched .so’s, and knew the standard approach was to just reinstall everything, because with an OS version upgrade, the standard Mac OS libraries probably changed versions/ABIs causing linkage errors/other inconsistencies. Typically that meant just doing brew upgrade
and stepping out for a coffee.
A few python things remained persistently problematic, which is why I had these scripts handy ready to blow out various parts of the environment:
#!/bin/bash
pushd ~/Library/Caches/pip && rm -rf http wheels && popd
pushd /usr/local/lib/python3.7/site-packages && rm -rf `find . -name __pycache__` && popd
#!/bin/sh
rm -rf dist/ *.egg-info/ build/ venv/ .pytest_cache/ .mypy_cache/
rm -rf `find . -name __pycache__`
python3 -m venv venv
source venv/bin/activate
pip install --upgrade pip
pip install -r requirements.txt
Despite all that, I still remained flummoxed by the fact that one service I was working on locally that was using snowflake-connector-python was still quitting unexpectedly with Abort trap: 6
.
Abort trap: 6
?Mac uses this definition of trap; this message appears when the abort()
function in the C standard library is called. It is akin to SIGABRT. There are various reasons to do an abort()
over doing a standard application shutdown, but typically it’s more controlled than a segfault, but deeper into library/system internals and thus out of control of the developer. An abort()
in the Linux kernel for instance will cause a kernel panic.
Weirdly enough, when abort()
is called in an application in Mac OS X, a very helpful dialog titled “$program quit unexpectedly” pops up, and it’s only through there that you can see detailed error messages, despite the fact that the application may have been called on the command line.
Either way, clicking on “Report” allowed me to dig in more into the messages to see what was the problem.
Crashed Thread: 2
Exception Type: EXC_CRASH (SIGABRT)
Exception Codes: 0x0000000000000000, 0x0000000000000000
Exception Note: EXC_CORPSE_NOTIFY
Application Specific Information:
/usr/lib/libcrypto.dylib
abort() called
Invalid dylib load. Clients should not load the unversioned libcrypto dylib as it does not have a stable ABI.
Huh. That’s odd.
It turns out that I wasn’t the only one encountering this error; many other folks had encountered this, and despite being shown the proper fix, some folks had posted a workaround that consisted of overwriting the library with a symlink to a pinned version. I decided that ultimately that was pretty tacky and not a good long-term solution, since inevitably there was no consistent version to link to, folks would eventually run into the problem again.
I went to go report this as a bug to snowflake, but discovered, in fact, someone had already beat me to it:
Someone traced the potential cause to something in the oscrypto library loading openssl, causing it to crash, but that’s where my trail ended, since no one could figure out a workaround to that, especially since oscrypto was created as a split from asn1crypto.
Since by this time I had realized that there was no easy good fix, and that this was actively blocking my work, I decided that I might as well investigate how to fix this once and for all.
The first step to fixing was of course, to identify the offending line of code in the dependency libraries that would trigger it. I use PyCharm as my development IDE at work, and some of its great features include both a way to click through to see original code definitions, and a really powerful graphical debugger that is very similar in usability to IntelliJ’s debugger.
However the debugger is not useful if I can’t figure out where to set possible breakpoints.
I tried tracing through from snowflake.connector.connect()
but soon got bogged down since it runs through the requests library as well. I took a step away for lunch/coffee and when I came back, I realized based on the hint above that it was probably a problem in oscrypto
, I looked for where oscrypto
was referenced in the snowflake library and added two breakpoints; one where it was imported, and one where the function was being used.
Cool, let’s try running the debugger and see if dig further.
Woah that’s weird! It crashed on the import?
After verifying that it was that one import line (by adding a third breakpoint and seeing if the next import succeeded at all), I decided to dig in further to see how that import was causing problems.
I then stumbled upon how the libcrypto libraries were being determined on Mac, and how they were being loaded, in a file called _libcrypto_cffi.py
:
libcrypto_path = _backend_config().get('libcrypto_path')
if libcrypto_path is None:
libcrypto_path = find_library('crypto')
if not libcrypto_path:
raise LibraryNotFoundError('The library libcrypto could not be found')
try:
vffi = FFI()
vffi.cdef("const char *SSLeay_version(int type);")
version_string = vffi.string(vffi.dlopen(libcrypto_path).SSLeay_version(0)).decode('utf-8')
except (AttributeError):
vffi = FFI()
vffi.cdef("const char *OpenSSL_version(int type);")
version_string = vffi.string(vffi.dlopen(libcrypto_path).OpenSSL_version(0)).decode('utf-8')
is_libressl = 'LibreSSL' in version_string
Aha! This might be where we’re running into problems! Let’s try the debugger and see if we can isolate the crash:
Bingo! We isolated the location of the problem!
Now that I found where the issue was, I decided to file an issue with the oscrypto project on github. But filing the bug probably was not going to mean it was going to get fixed overnight, so I decided I better investigate to see if I can find make a fix.
Since this seemed to be a Catalina-specific issue, and Apple recommended that we pin to specific versions of the libcrypto dylibs, it seemed like the obvious fix would be to do just that. So I proposed the following change:
# if we are on catalina, we want to strongly version libcrypto since unversioned libcrypto has a non-stable ABI
if sys.platform == 'darwin' and platform.mac_ver()[0].startswith('10.15') and \
libcrypto_path.endswith('libcrypto.dylib'):
# libcrypto.42.dylib is in libressl-2.6 which as a OpenSSL 1.0.1-compatible API
libcrypto_path = libcrypto_path.replace('libcrypto.dylib', 'libcrypto.42.dylib')
and
# if we are on catalina, we want to strongly version libssl since unversioned libcrypto has a non-stable ABI
if sys.platform == 'darwin' and platform.mac_ver()[0].startswith('10.15') and libssl_path.endswith('libssl.dylib'):
# libssl.44.dylib is in libressl-2.6 which as a OpenSSL 1.0.1-compatible API
libssl_path = libssl_path.replace('libssl.dylib', 'libssl.44.dylib')
Why 42
for crypto vs 44
for ssl? As per this discussion:
$ for i in `ls libcrypto.*.dylib`; do echo -n $i:; strings $i | grep libressl | head -n1 | cut -d'/' -f9; echo; done
...
libcrypto.42.dylib:libressl-2.6
...
$ for i in `ls libssl.*.dylib`; do echo -n $i:; strings $i | grep libressl | head -n1 | cut -d'/' -f9; echo; done
...
libssl.44.dylib:libressl-2.6
...
We didn’t have a problem with libssl
yet, but better safe than sorry!
This was a little bit tricky, due to the fact that this was in a library pulled as a dependency. So to test this, I cloned a copy of the repo down, added my fix, and installed from that local copy by installing it as an egg:
pip install file:///Users/shh/Development/github/oscrypto#egg=oscrypto
Running the debugger again in fact confirms that the fix works!
As of this writing, I am happy to say that the fix was merged shortly after I made the PR, and released in v1.1.1 of oscrypto! Future users should no longer be running into this problem :).
Thank you for reading!
]]>The typical (but not only) background is for folks to come straight from an undergraduate program. Often this is their first full-time job, or first full-time job in tech, so it is critical to set expectations and guidance from the very start:
What level were you hired at? This should be easy to figure out through your HR portal. Sometimes this level is public to the whole company, sometimes it’s not. There is nothing preventing you from discussing your level with others. Your level defines your salary band and official title, which may or may not be also present in said HR portal.
Knowing where you are in your salary band is a generally good indicator of what the company initially expects of you. Lower in the band probably means you’re early in the level; mid-point means you’re performing on average; high in the band means they probably expect you to level up soon.
Titles are superfluous within a company, but are important for gaining a different job outside of the company. Titles may also be affected with ladders/tiers, and so if there is a slight difference between your title and your coworker’s title, you are likely on different ladders. Asking HR what these mean is always a good idea.
A mature company should have career ladder documents and expectations for each level clearly posted, e.g. like Square has. Once you know your level, it’s important to take a look at what the expectations are at your current level, and then what the expectations are at your next level. Many tech companies declare that they will promote you once you have demonstrated that you are performing at the next level. The way to meet those next level expectations is to then seek out opportunities that will allow you to demonstrate those skills.
I think the most intimidating thing for folks who’ve never gone through a promotion process before, is figuring out when the right time to ask for a promotion is. If you are conflict-averse but a hard worker, you may happen to have a really good manager who just files a promotion for you with very little work on your part. Unfortunately this may make it harder to figure out when the right time for a promotion is later on!
Unsurprisingly, different companies will have different paths for the employee who seeks a promotion. Some require the employee to put together the packet and present it to the manager who will forward it on. Others require the manager to put together the packet and forward it on. Yet even others might be extremely informal about the process. In all these cases, there’s generally a review panel, whether org-specific or company-wide, that will discuss review all the packets and approve who gets a promotion.
There are multiple reasons why, in a steady-state, you may not “automatically” get a promotion. Your manager may be overworked, distracted, new, dealing with other situations and is simply forgetting about how promotions are important. It may be your manager hasn’t seen enough evidence from you and doesn’t feel confident about your case. It may be there are other more critically needed promotion packets that demand their attention.
In any of these cases, even if your manager is fully supportive of your case for promotion, you should assume that your manager doesn’t have 100% visibility to your work. Doing some upfront work whether it be familiarizing yourself with the promotion process, making a hype doc, or otherwise documenting clear evidence that supports traits for level+1, will all make your manager extremely grateful during the promo period.
I mentioned that there may be multiple reasons why your manager doesn’t feel they have seen enough evidence. A large chunk of that is visibility of not just accomplishments, but also problems of the employee. A good manager wants to know about both wins and struggles from the employee so that they can figure out how to make the situation better/provide advice.
One of the analogies I’ve made to several managers about their work is that they’re effectively playing a Real-Time Strategy game, e.g. say Starcraft. Their day-to-day is to figure out where the logistical and management problems are, solve those, to ensure they have efficient output. They are less concerned about the fact that they are out of Vespene gas, and more concerned about why they are out of it, what is the rate of Vespene gas usage, why was it drained suddenly, and how can they ensure that rate of use is consistent so they don’t run out again. In a game it’s easy to get visibility because lots of things show rates and metrics; in the real world, they have to rely on their reports being effective communicators of potential problems before they become actual problems.
I should add also that whenever I’ve made this analogy, a lot of managers chuckle and strongly agree.
Complaining about potential problems is okay; understanding, dissecting, and explaining how problems are affecting your work/timeline/time estimates is even better. The technique to becoming a senior engineer is not just solving harder/more complex problems; it’s being able to understand tradeoffs, potential risks to the project, and outlining possible solution avenues, ahead of time of roadblocks. This is something that only comes with practice and diligence. Coupled with effective communication, and now your manager feels confident enough to defer to you and be hands-off because you have control over the situation.
There’s a reason why senior engineers often transition to full-time management, and it’s because of the assumption that they have been already doing this really well for their projects. (Whether they are actually ready to go into management is another question for another day). There is the implicit expectation that senior engineers are also good at project management, and this is often recorded as explicit line items in leveling documents, such as leading a team, facilitating discussion, estimating risk, being able to break down a large task into smaller tasks, etc. You will likely not succeed in a senior+ capacity if you do not take on rudimentary project management skills.
It is hard to do things like, promotion evidence, project planning, root-cause analysis, trade-off analysis, etc. if things aren’t written down. The higher you go, the more complex problems become, and the easier it becomes to forget decisions made in Slack or verbally. Becoming an effective worker in tech really involves becoming an effective communicator, at the very least in a written medium. (There’s also a good reason to become an effective oral communicator, but I argue doing it in written form should be done first…. even though I’m personally not actually good at this). When things are written down, you spend less time rehashing decisions, and less time spinning wheels, and more time actually executing.
It may seem extremely daunting to figure out how to get to senior+ when you have just graduated from school. Start simple and easy; comment on design documents and code review by asking questions (asking questions is a good exercise in forces the author to re-explain, and if you can’t understand what they’re writing, you’re probably not the only one); question assumptions, especially to dig out historical decisions, thinking, or libraries; trust your manager/team when they give you a larger-ish project, and remember that executing a project is never a singular effort, but a team one, so leverage your team. Finally feel free to propose crazy ideas; sometimes people haven’t literally thought about that option, because the older you get, the crustier you get.
Once you get into the flow of things, I guarantee things will start falling into place.
Just about everyone feels terrified in their first year at a workplace. This is a normal feeling. It will go away as you build confidence. Take note of other new hires that are senior, and watch as they make the same mistakes as you. The best senior hires are those who are honest upfront about how they don’t know everything, but are willing to learn with you and listen to you.
Good luck!!! and onward!!!
]]>Resources:
It’s been a while since the last 3D printer update. You might remember previously, I was able to get it hooked up to a raspberry pi and set up Octoprint just fine. Since then, I’ve been down a bit of a rabbit hole in terms of learning more about 3D printing in general. Not all will be covered here; instead I’ll talk about some of the easier mods/improvements that can be done with this printer.
Probably the first thing you want to do is get a good set of feet to ensure proper airflow from under the printer. I got these rubber ones and installed 6 for stability.
If you find the stock fans noisy, or, you intend to use your printer fairly regularly, it makes sense to also replace them. The bottom 60mm fan is originally 10mm wide, but if you use a 25mm fan instead (like this one from Noctua) with some careful cable positioning, it should fit fine.
The connector is a stock 2-pin small JST-XHP connector; I chopped off the molex adapter that came with the Noctua and put on the JST.
The extruder fan is 30mm fan that is 10mm wide. I used the recommended one from the wiki. I’m not sure what this connector is, so I soldered the fan cable onto the existing cable and finished with heatshrink tubing.
The stock build plate is not ideal, many have commented having better luck with a borosilicate glass build surface. I have found that it’s much easier to remove prints than before, and you get the nice side effect of a smooth bottom. The tricky bit however is the initial and continue adhesion during the printing process. As the internet has advised, providing something initially tacky and unsunny the build plate has heated up sufficiently is key to having successful adhesion. Some use glue sticks; I have opted for “hold” hairspray. You can find the plate here.
I also got a thermal mat and carefully adhered the mat to the metal plate, and then the glass plate to the mat, removing as many bubbles as possible (similar to a CPU heatsink compound application process). To ensure even heating, I used my thermal camera to monitor the plate warmup process.
If you’re more ambitious, you can perform a faceplate swap on the printer + accompanying PCB, moving the screen to the top of the printer. I didn’t quite do that, instead opting to remove the screen entirely, since it appears to operate over USB fine without it (and moving the top metal plate to the bottom). I suspect that the PCB controls wifi along with the basic web interface that it advertises, since others report that the data going over its connecting cable may just be half-speed serial.
Finally, various sources recommend ensuring that the printer is properly calibrated. It turns out that all prints by default come out about 2-3% smaller than expected, and the firmware configuration must be updated as such.
Unfortunately not too many pictures/videos of these mods I’ve performed yet, but they will come soon. I am eventually hoping to make a 3D printer “hat” where the raspberry pi and other peripherals may live. Here’s a sneak peak!
]]>
This guide is to help you set up a YubiKey to sign git commits and also SSH into servers using key-based auth. It’s intended for software developers who want marginally more security and peace of mind while doing development.
If you want a more advanced/detailed howto, with references, checkout this guide instead (not mine).
I assume you know the following:
I assume you have the following:
ykman
(on mac, you can use homebrew and brew install ykman
)$ ykman openpgp reset
WARNING! This will delete all stored OpenPGP keys and data and restore factory settings? [y/N]: y
Resetting OpenPGP data, don't remove your YubiKey...
Success! All data has been cleared and default PINs are set.
PIN: 123456
Reset code: NOT SET
Admin PIN: 12345678
$ gpg --card-edit
Reader ...........: Yubico Yubikey 4 OTP U2F CCID
Application ID ...:
Version ..........: 2.1
Manufacturer .....: Yubico
Serial number ....:
Name of cardholder: [not set]
Language prefs ...: [not set]
Sex ..............: unspecified
URL of public key : [not set]
Login data .......: [not set]
Signature PIN ....: not forced
Key attributes ...: rsa2048 rsa2048 rsa2048
Max. PIN lengths .: 127 127 127
PIN retry counter : 3 0 3
Signature counter : 0
Signature key ....: [none]
Encryption key....: [none]
Authentication key: [none]
General key info..: [none]
gpg/card> admin
Admin commands are allowed
gpg/card> passwd
gpg: OpenPGP card no. detected
1 - change PIN
2 - unblock PIN
3 - change Admin PIN
4 - set the Reset Code
Q - quit
Your selection? 1
PIN changed.
1 - change PIN
2 - unblock PIN
3 - change Admin PIN
4 - set the Reset Code
Q - quit
Your selection? 3
PIN changed.
1 - change PIN
2 - unblock PIN
3 - change Admin PIN
4 - set the Reset Code
Q - quit
Your selection? q
$ gpg --export-secret-keys 8A2BD353 > 8A2BD353.asc
$ gpg --edit-key 8A2BD353
gpg (GnuPG) 2.2.12; Copyright (C) 2018 Free Software Foundation, Inc.
This is free software: you are free to change and redistribute it.
There is NO WARRANTY, to the extent permitted by law.
Secret key is available.
gpg: checking the trustdb
gpg: marginals needed: 3 completes needed: 1 trust model: pgp
gpg: depth: 0 valid: 1 signed: 0 trust: 0-, 0q, 0n, 0m, 0f, 1u
sec rsa4096/BDE438068A2BD353
created: 2013-09-11 expires: never usage: SC
trust: ultimate validity: ultimate
ssb rsa4096/422DAD542FC162F9
created: 2013-09-11 expires: never usage: E
ssb rsa4096/1EA455BF07A988D2
created: 2019-07-23 expires: never usage: A
[ultimate] (1). Sarah Harvey <-@shh.sh>
[ultimate] (2) Sarah Harvey <-------@cs.uwaterloo.ca>
[ultimate] (3) Sarah Harvey <------------@gmail.com>
[ultimate] (4) Sarah Harvey <-------@csclub.uwaterloo.ca>
[ultimate] (5) [jpeg image of size 13232]
[ultimate] (6) Sarah Harvey <---@squareup.com>
gpg> keytocard
Really move the primary key? (y/N) y
Please select where to store the key:
(1) Signature key
(3) Authentication key
Your selection? 1
gpg> key 1
sec rsa4096/BDE438068A2BD353
created: 2013-09-11 expires: never usage: SC
trust: ultimate validity: ultimate
ssb* rsa4096/422DAD542FC162F9
created: 2013-09-11 expires: never usage: E
ssb rsa4096/1EA455BF07A988D2
created: 2019-07-23 expires: never usage: A
gpg> keytocard
Please select where to store the key:
(2) Encryption key
Your selection? 2
gpg> key 1
gpg> key 2
sec rsa4096/BDE438068A2BD353
created: 2013-09-11 expires: never usage: SC
trust: ultimate validity: ultimate
ssb rsa4096/422DAD542FC162F9
created: 2013-09-11 expires: never usage: E
ssb* rsa4096/1EA455BF07A988D2
created: 2019-07-23 expires: never usage: A
gpg> keytocard
Please select where to store the key:
(3) Authentication key
Your selection? 3
sec rsa4096/BDE438068A2BD353
created: 2013-09-11 expires: never usage: SC
trust: ultimate validity: ultimate
ssb rsa4096/422DAD542FC162F9
created: 2013-09-11 expires: never usage: E
ssb* rsa4096/1EA455BF07A988D2
created: 2019-07-23 expires: never usage: A
gpg> quit
Save changes? (y/N) y
$ git config --global commit.gpgsign true
For good measure, kill gpg-agent and restart your terminal:
$ killall gpg-agent # forces gpg-agent to restart
Add the following to ~/.bash_profile
(mac-specific):
GPG_AGENT_SOCKET="$HOME/.gnupg/S.gpg-agent.ssh"
if [ ! -S $GPG_AGENT_SOCKET ]; then
gpg-agent --use-standard-socket --daemon >/dev/null 2>&1
export GPG_TTY=$(tty)
fi
unset SSH_AGENT_PID
export SSH_AUTH_SOCK=$GPG_AGENT_SOCKET
Add the following to ~/.gnupg/gpg-agent.conf
:
default-cache-ttl 600
max-cache-ttl 7200
enable-ssh-support
For good measure, kill gpg-agent and restart your terminal:
$ killall gpg-agent
Extract your new SSH pubkey from your yubikey:
$ ssh-add -L > ~/.ssh/id_yubikey.pub
Add the contents of that pubkey to your remote server’s ~/.ssh/authorized_keys
.
This is an unboxing post. I got the ADABOX 012 subscription box a few weeks ago and took some pictures of the unboxing. Haven’t gotten around to serious programming yet; that will be a future post.
]]>
I’ve recently been exploring embedded devices and programming more recently, mostly for fun. I stumbled upon this neat tiny microcontroller called Micro:Bit that is marketed as an Arduino alternative for kids. It packs in a 5x5 LED grid, some buttons, and a few sensors. It’s powered by a ARM Cortex-M0 microcontroller with 256K flash memory. It even supports Bluetooth!
But more interesting is the programming mechanism for this device. The marketed official programmer is Microsoft MakeCode.
Here you can drag and drop different blocks that explain what need to happen with the Micro:Bit. Flashing the device is also incredibly easy. The Micro:Bit when plugged in via USB appears as a USB drive called “MICROBIT”. You then need to simply click “Download”, which downloads a .hex file, and copy it to the USB drive. This action will auto-flash the device with whatever file that was provided. One side effect is that most computers will report that the drive “ejected uncleanly”, but for this system, that’s perfectly fine to ignore. Neat!
I also got a little plastic robot enclosure to play around with the Micro:Bit when bored. It was fairly easy to assemble.
The servos do require a bit of calibration, so it’s best to note rush through building these. With the platform on the top I may try to add a robot arm as well, and I think I may also add some contact or light sensors to help it self-navigate.
I also got a PyGamer and a Circuit Playground Express that I need to cover, but this post already has a ton of pictures. So I will end here for now.
]]>As you may know from previous posts, I was able to set up a rudimentary printing process with OctoPrint and my 3D printer. This relied on an old version of CuraEngine that was on the Raspberry Pi itself, but over time it became clear that that was not the most optimal way to 3D print. The next step was figuring out how improve my 3D model design and print flow to get clean, accurate prints.
Some of you might be asking what I use to design 3D models for printing. Right now I use a piece of software called SketchUp to create very basic 3D models to print. As a beginner, I find that SketchUp has a reasonable learning curve, and has minimal controls so it’s not overwhelming in options. There are a few gotchas however; for instance, you must use a mouse with a middle button for it’s impossible to use with a touchpad; it’s not easy to custom set the dimensions of different shapes; and unless you have ruler snapping turned on, you’ll have a rough time getting everything arranged/oriented properly.
Once designed in SketchUp, I export the file to STL. Before this, I would upload this to OctoPrint directly and have OctoPrint slice it. Instead though, I could pre-slice on my on computer before uploading the STL.
I installed Cura 4 from Ultimaker, to see how much it had improved from the super-old version on the pi. It turns out that Cura 4 does not have a profile available for my 3D printer out of the box. Thankfully, the maker community has kindly come up with different battle-tested profiles to install for Cura 4; I used this one by Brian Kurtz. The nice part about this is it bakes in the auto-calibrations for the printer. It turns out that the optimal thicknesses for printing for the delta are in multiples of 0.07mm, not the other multiples that are default in the software. Another useful setting I discovered was to enable the Z Hop When Retracted setting which prevented the nozzle head from colliding with the model during print.
Finally, Cura assumes your printer is either directly connected or is on the network. This is only partially true for my 3D printer that’s connected to OctoPrint. While Cura doesn’t support OctoPrint out of the box, it does support user plugins. Combined with OctoPrint’s support of a REST API, someone has kindly written a Cura plugin to slice/print to OctoPrint printers. All you have to then do is add your printer as a “local printer”, and click the button to connect to OctoPrint (it will helpfully guide you through setting up an API key too).
I have some nice action shots of going through each screen in Cura in the import, slicing, preview, and printing process.
There are some other niceties offered by Cura, for instance it will highlight any problematic faces in your model by coloring them red.
In SketchUp, the usual reason for this is that the face is accidently inverted. All outside/visible faces should be by default colored white, whereas, inside faces should be by default colored blue. In the example below, you can already predict that this model will have problems with slicing.
You can also view any possible accident clipping issues by using X-Ray mode in SketchUp:
That’s all I have for now. As you can tell, I’m in the midst of printing a custom housing that will eventually hold some cameras to do timelapses of prints.
Stay tuned for further progress!
]]>